Decorator란?

데코레이터는 함수로서 호출됩니다. 데코레이터 함수는 꾸밀 대상인 클래스, 메서드, 프로퍼티를 인자로 받고, 그 대상을 변경한 결과를 반환합니다. 이 결과를 다시 대상에 할당함으로써, 대상을 꾸밀 수 있습니다.
자바스크립트의 데코레이터는 클래스, 메서드, 프로퍼티 등을 꾸밀 수 있는 기능입니다.
ES2016(ES7)에서는 이 기능이 표준으로 추가되었습니다.
•
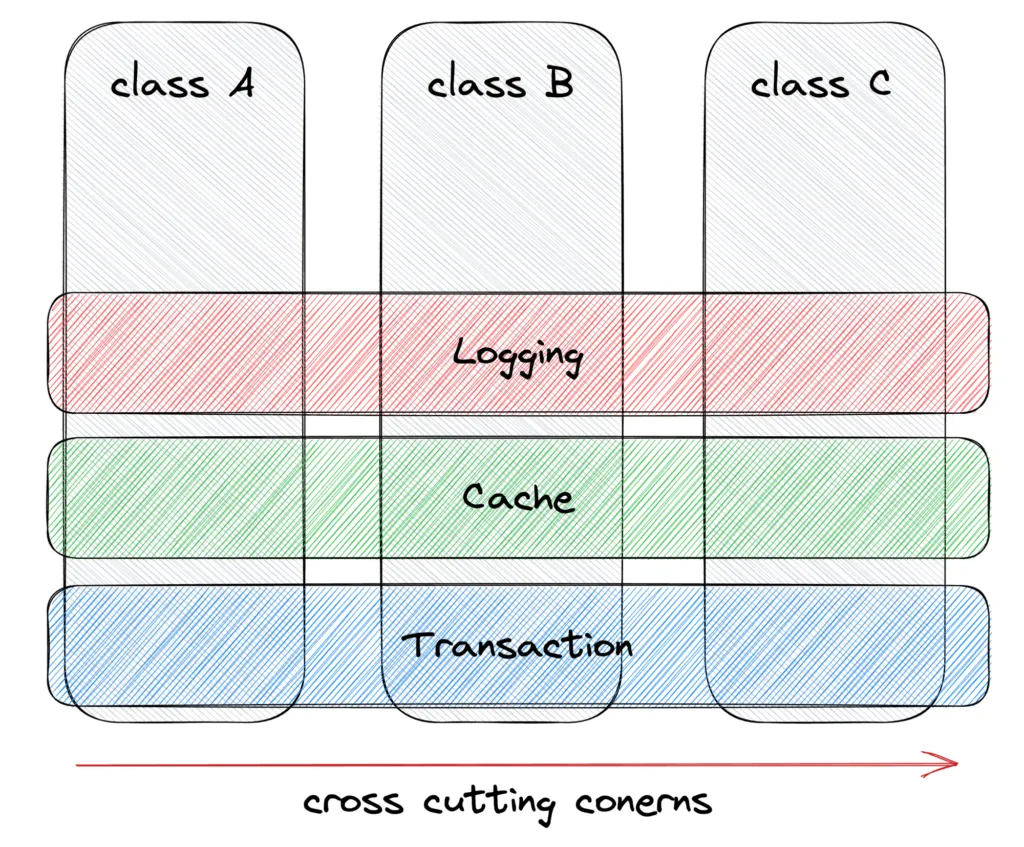
데코레이터는 비즈니스와 상관 없는 로직들을 숨기면서 기능을 변경하거나 확장할 수 있게 한다.
•
또한 여러 클래스에서 반복되는 공통 관심사가 있을 때 데코레이터를 사용하면 중복 코드를 줄이고 코드를 모듈 단위로 관리하는 효과를 거둘 수 있다.
TypeScript에서의 Decorator
TypeScript 및 ES6에 클래스가 도입됨에 따라, 클래스 및 클래스 멤버에 어노테이션을 달거나 수정하기 위해 추가 기능이 필요한 특정 시나리오가 있습니다. 데코레이터는 클래스 선언과 멤버에 어노테이션과 메타-프로그래밍 구문을 추가할 수 있는 방법을 제공합니다. 데코레이터는 JavaScript에 대한 2단계 제안이며 TypeScript의 실험적 기능으로 이용 가능합니다.
tsconfig.json
{
"compilerOptions": {
"target": "ES5",// 데코레이터를 만들 때 인자로 쓰이는 PropertyDescriptor는 ES5부터 생겼다.
"experimentalDecorators": true
}
}
JSON
복사
소개
•
데코레이터의 종류 및 적용 가능 범위
◦
Class
◦
Class Property
◦
Class Method
◦
Class Accessor
◦
Class Method Parameter
•
사용 방법
•
사용할 데코레이터 앞에 @ 연산자를 추가하면 데코레이터가 대상에 적용된다.
function decorator(target) {
console.log("---hi I am a decorator---");
target.prototype.name = "New name";
}
@decorator
class MyClass {}
console.log(MyClass.prototype.name); // 'New name'
TypeScript
복사
•
5가지 데코레이터에 대한 코드이다.
@classDecorator
class Bird {
@propertyDecorator
name: string;
@methodDecorator
fly(
@parameterDecorator
meters: number
) {}
@accessorDecorator
get egg() {}
}
TypeScript
복사
Decorator 적용 순서
•
가장 안쪽에 있는 데코레이터부터 적용된다.
◦
1. 각 Instance member에 대해 Parameter Decorator 다음에 Method, Accessor 또는 Property Decorator가 적용된다.
◦
2. 각 Static member에 대해 Parameter Decorator 다음에 다음에 Method, Accessor 또는 Property Decorator가 적용된다.
◦
3. 생성자(constructor)에 대해 Parameter Decorator가 적용된다.
◦
4. Class에 있는 Class Decorator가 적용된다.
function f(key: string): any {
console.log("evaluate: ", key);
return function () {
console.log("call: ", key);
};
}
@f("Class Decorator")
class C {
@f("Static Property")
static prop?: number;
@f("Static Method")
static method(@f("Static Method Parameter") foo) {}
constructor(@f("Constructor Parameter") foo) {}
@f("Instance Method")
method(@f("Instance Method Parameter") foo) {}
@f("Instance Property")
prop?: number;
}
TypeScript
복사
// output
evaluate: Instance Method
evaluate: Instance Method Parameter
call: Instance Method Parameter
call: Instance Method
evaluate: Instance Property
call: Instance Property
evaluate: Static Property
call: Static Property
evaluate: Static Method
evaluate: Static Method Parameter
call: Static Method Parameter
call: Static Method
evaluate: Class Decorator
evaluate: Constructor Parameter
call: Constructor Parameter
call: Class Decorator
TypeScript
복사
NestJS Decorator
작동 방식
•
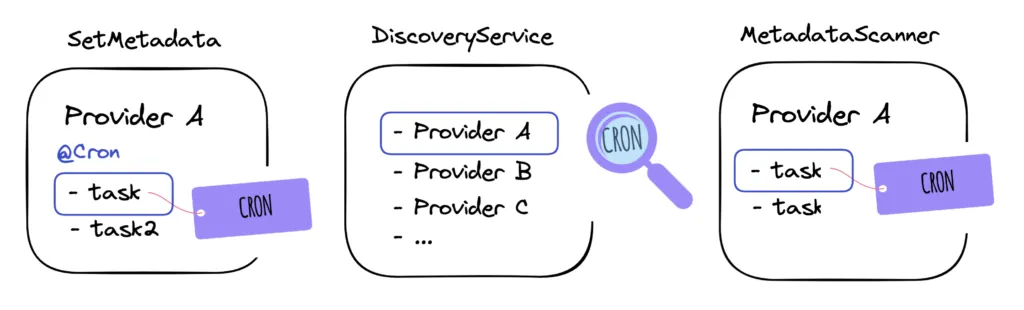
NestJS가 데코레이터를 등록하는 과정은 마킹 - 조회 - 등록으로 크게 3단계로 나뉜다.
Cron 데코레이터의 경우
1.
마킹
•
SetMetadata라는 함수로 특정 메서드에 Cron 심볼을 메타데이터 키로 등록한다.
2.
조회
•
모듈이 초기화되는 시점에 DiscoveryService와 MetadataScanner로 모든 Provider 클래스를 순회하며 Cron 심볼을 메타데이터로 가지고 있는 메서드들을 찾는다.
3.
등록
•
메서드를 찾았으면 해당 메서드를 크론 잡으로 등록한다.
•
NestJS에서 제공하는 SetMetadata와 DiscoverService, 그리고 MetadataScanner를 사용하면, 특정 클래스나 메서드만 필터링하여 IoC내 다른 Provider를 사용해 원하는 로직들을 적용할 수 있다.
SetMetadata
•
SetMatadata는 타켓(클라스, 메서드)에 메타데이터를 마킹하는 데코레이터를 반환하는 함수이다.
•
export const SetMetadata = <K = string, V = any>(
metadataKey: K,
metadataValue: V,
): CustomDecorator<K> => {
const decoratorFactory = (target: object, key?: any, descriptor?: any) => {
if (descriptor) {
Reflect.defineMetadata(metadataKey, metadataValue, descriptor.value);
return descriptor;
}
Reflect.defineMetadata(metadataKey, metadataValue, target);
return target;
};
decoratorFactory.KEY = metadataKey;
return decoratorFactory;
};
TypeScript
복사
◦
Reflect.defineMetadata(metadataKey, metadataValue, class or method);
•
SetMetadata 함수 내부에서는 Reflect.defineMetadata 메서드를 통해 타겟 객체에 metadataKey, metadataValue를 내부 슬롯에 정의한다.
•
내부 슬롯
reflect-metadata
SetMetadata(key, value) -> CustomDecorator;
•
SetMetadata의 리턴값은 클래스, 메서드 데코레이터로 사용 가능하다.
•
해당 데코레이터로 타켓 클래스나 메서드에 대한 메타데이터를 설정할 수 있다.
const SYMBOL = Symbol("SYMBOL")
function CustomDecorator(key: string | symbol) {
// SetMetadata(SOMETHING, key)와 다른 데코레이터를 합성할 수 있습니다.
return applyDecorators(SetMetadata(SYMBOL, key), AnotherDecorator)
}
@CustomDecorator("KEY1")
class DecoratedClass {}
TypeScript
복사
•
@CustomDecorator("KEY1")
◦
DecoratorClass에 SYMBOL 심볼을 metadataKey, "KEY1"을 metadataValue로 등록한다.
DiscoveryService
•
DiscoveryModule의 DiscoveryService에서는 내부적으로 modulesContainer를 사용하여 모든 모듈의 Controller와 Provider 클래스를 조회할 수 있다.
•
DiscoveryService를 사용하여 모든 Provider 클래스를 순회하며, SetMetadata로 등록했던 metadata key로 특정 Provider를 필터링할 수 있게 된다.

•
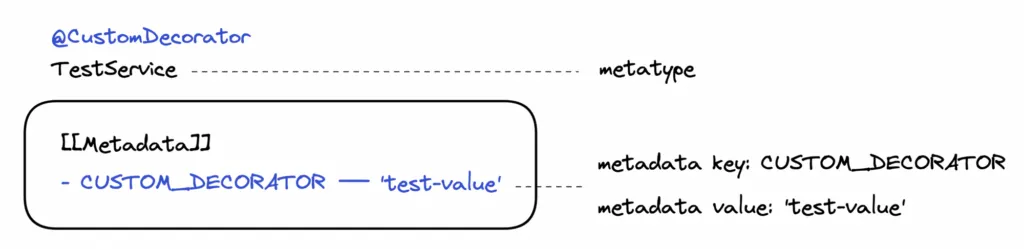
CustomDecorator가 붙은 메서드를 찾는 과정을 예로 들어보겠다.
•
metadata key는 CUSTOM_DECORATOR가 심볼이고, metadata value는 test-value이다.
export const CUSTOM_DECORATOR = Symbol("CUSTOM_DECORATOR");
export const CustomDecorator = SetMetadata(CUSTOM_DECORATOR, 'test-value');
@CustomDecorator
@Injectable()
class TestService {
test() {}
}
TypeScript
복사
•
아래의 explorerService.find(CUSTOM_DECORATOR) 메서드를 실행하면 어떻게 될까?
import { Injectable } from '@nestjs/common';
import { DiscoveryService, MetadataScanner, Reflector } from '@nestjs/core';
@Injectable()
export class ExplorerService {
constructor(
private readonly discoveryService: DiscoveryService,
) {}
find(metadataKey: string | symbol) {
const providers = this.discoveryService.getProviders();
return providers
.filter((wrapper) => wrapper.isDependencyTreeStatic())
.filter(({ metatype, instance }) => {
if (!instance || !metatype) {
return false;
}
return Reflect.getMetadata(metadataKey, metatype);
})
.map(({ instance }) => instance);
}
}
TypeScript
복사
•
첫 번째 필터 : filter((wrapper) => wrapper.isDependencyTreeStatic())
◦
request scope가 아닌 싱글톤 Provider만 필터링한다.
•
두 번째 필터 : Reflect.getMetadata(metadataKey, metatype)
◦
해당 필터는 metadata가 등록된 클래스만 필터링한다.
•
metatype은 class TestService와 같이 해당 Provider의 클래스를 의미한다.
•
Reflect.getMetadata(metadataKey, metatype)은 metatype(클래스)에 metadataKey로 등록된 metadata value를 가져온다. TestService 클래스의 경우 metadata key는 CUSTOM_DECORATOR이고 value는 test-value이다.
•
만약 등록된 metadata가 없으면 undefined을 반환하고 해당 Provider는 필터링 된다.
MetadataScanner
•
앞의 DiscoveryService에서는 데코레이팅된 메서드를 가진 인스턴스에만 접근한다.
•
실제 데코레이팅된 메서드에 접근하기 위해서는 DiscoveryModule에서 제공하는 MetadataScanner를 사용해야 한다.

export class MetadataScanner {
public scanFromPrototype<T extends Injectable, R = any>(
instance: T,
prototype: object,
callback: (name: string) => R,
): R[] {
const methodNames = new Set(this.getAllFilteredMethodNames(prototype));
return iterate(methodNames)
.map(callback)
.filter(metadata => !isNil(metadata))
.toArray();
}
*getAllFilteredMethodNames(prototype: object): IterableIterator<string> {
// prototype에 등록된 method 이름들을 가져온다.
}
}
TypeScript
복사
•
scanFromPrototype는 getAllFilteredMethodNames 메서드로 인스턴스의 모든 메서드 이름들을 가져와 인자로 받은 callback을 실행시킵니다. 이 중에서 metadata가 있는 메서드만 필터링한다.
•
scanFromPrototype의 callback 파라미터에서 인스턴스 메서드에 접근할 수 있다. 이제 메서드에 접근해 데코레이팅 함수로 덮어씌울 수 있다.
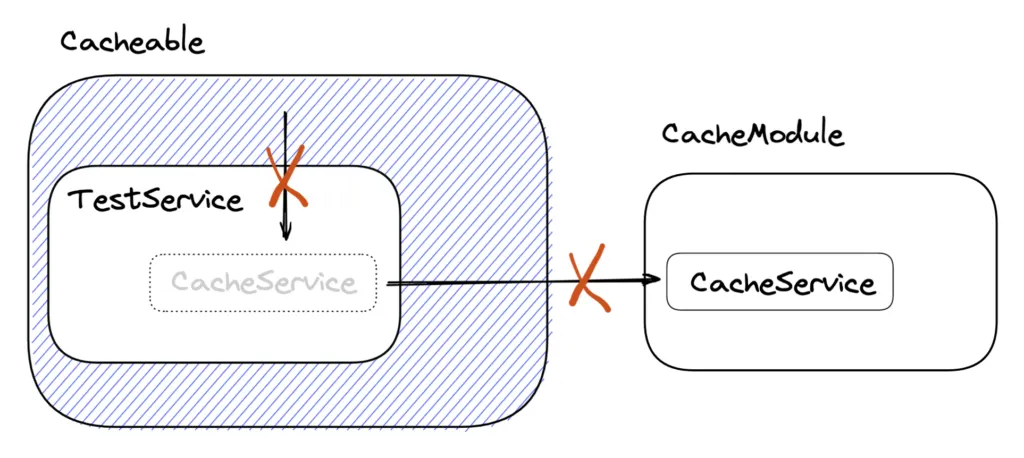
NestJS에서 캐싱하기
@Injectable()
class TestService {
@Cacheable('key')
test() {
// 비즈니스 로직
}
}
TypeScript
복사
•
위와 같이 TestService라는 class가 있을 때, 캐싱 로직을 @Cacheable 사용해 비즈니스 로직과 분리하려고 한다.
•
@Cacheable에서 CacheManager라는 Provider를 사용하려면 어떻게 접근해야 할까?
문제점 - Function Decorator
•
해당 코드는 Cache aside 패턴으로 작성된 코드이다.
// CacheModule을 import
@Module{
imports: [CacheModule.register(...)]
providers: [TestService]
}
class TestModule {}
TypeScript
복사
function Cacheable(key: string, ttl: number) {
return function (target: any, _key: string, descriptor: PropertyDescriptor) {
const methodRef = descriptor.value;
descriptor.value = async function (...args: any[]) {
console.log(this) // TestService {}
// TypeError: Cannot read properties of undefined (reading 'get')
const value = await this.cache.get(key);
if (value) {
return value;
}
const result = await methodRef.call(this, ...args);
await this.cache.set(key, result, ttl);
console.log(result)
return result;
};
};
}
TypeScript
복사
•
TestModule에서 CacheModule을 import하고 있긴 하지만 TestService에서 CacheManger를 주입하지 않는 이상 Cacheable에서 CacheManger에 접근할 방법이 없다.
•
그 때문에 @Cacheable를 사용하려면 클래스에 항상 CacheManger를 주입해야 하는 불편함이 있다.
Custom Decorator로 해결 (DiscoveryModule + OnModuleInit)
@Injectable()
export class CacheDecoratorRegister implements OnModuleInit {
constructor(
private readonly discoveryService: DiscoveryService,
private readonly metadataScanner: MetadataScanner,
private readonly reflector: Reflector,
private readonly cache: Cache,
) {}
// OnModuleInit event에 이 메소드를 실행합니다.
onModuleInit() {
return this.discoveryService
.getProviders() // #1. 모든 provider 조회. (모든 singleton instance를 가져온다)
.filter((wrapper) => wrapper.isDependencyTreeStatic())
.filter(({ instance }) => instance && Object.getPrototypeOf(instance))
.forEach(({ instance }) => {
// #2. 모든 Provider instance의 method를 순회한다.
this.metadataScanner.scanFromPrototype(
instance,
Object.getPrototypeOf(instance),
// #3. callback 함수에 instnace의 methodName을 전달.
(methodName) => {
// #4. Get matadata value.
const ttl = this.reflector.get(CACHEABLE, instance[methodName]);
if (!ttl) {
return;
}
const methodRef = instance[methodName];
// #5. 기존 함수 데코레이팅.
instance[methodName] = async function (...args: any[]) {
const name = `${instance.constructor.name}.${methodName}`;
const value = await this.cache.get(name, args);
if (value) {
return value;
}
const result = await methodRef.call(instance, ...args);
await this.cache.set(name, args, result, ttl);
return result;
};
},
);
});
}
}
TypeScript
복사
•
해당 클래스를 모듈의 provider에 등록하면, onModuleInit 단계에서 @Cacheable로 데코레이팅된 메서드를 찾아 기존 메서드를 덮어씌운다.
•
메서드 데코레이터를 만드는 과정은 다음과 같다.
1.
모든 Provider 클래스를 순회한다.
2.
특정 metadata가 등록된 메서드 탐색한다.
3.
기존 메서드를 덮어씌운다.
3의 과정에서, CacheDecoratorRegister 생성자에 주입한 CacheManger를 사용할 수 있다.
문제점 - Controller
•
위와 같이 만든 데코레이터를 적용했을 때 Service, Repository 등 Provider에서는 잘 작동하지만 Controller Layer에서는 적용되지 않는 현상이 있다.
•
알아본 결과 NestJS의 Controller는 Proxy를 사용하고 있어서 데코레이팅할 때 정확한 인스턴스를 찾는게 어렵다고 한다.
◦
실제로 Jest의 출력 결과를 보면 Controller에서는 Proxy.registerCacheAndJob라고 나오고 Service에서는 RedisCacheService.pingRedis라고 나온다.
> jest --detectOpenHandles
console.log
async (...args) => {
...
}
at Proxy.registerCacheAndJob (src/cache-decorator.explorer.ts:101:15)
at Function.from (<anonymous>)
console.log
async (...args) => {
...
}
at Proxy.registerCacheAndJob (src/cache-decorator.explorer.ts:101:15)
at Function.from (<anonymous>)
console.log
IN RedisCacheService pingRedis
at RedisCacheService.pingRedis (src/cache-decorator.explorer.ts:127:15)
console.log
Cached { cacheKey: 'RedisCacheService:pingRedis:PING_REDIS' }
at RedisCacheService.pingRedis (src/cache-decorator.explorer.ts:154:7)
FAIL src/__test__/redis-cache-module.test.ts
Redis Cache
✓ Check Service Redis Caching (175 ms)
✕ Check Controller Redis Caching (97 ms)
TypeScript
복사
•
그 때문에 NestJS에서는 Controller에서 캐싱이 필요할 때 Interceptor를 주로 사용한다고 한다.
NestJS 공식 디스코드 채널에 문의한 결과 NestJS Core팀 개발자분께서 달아주신 답변
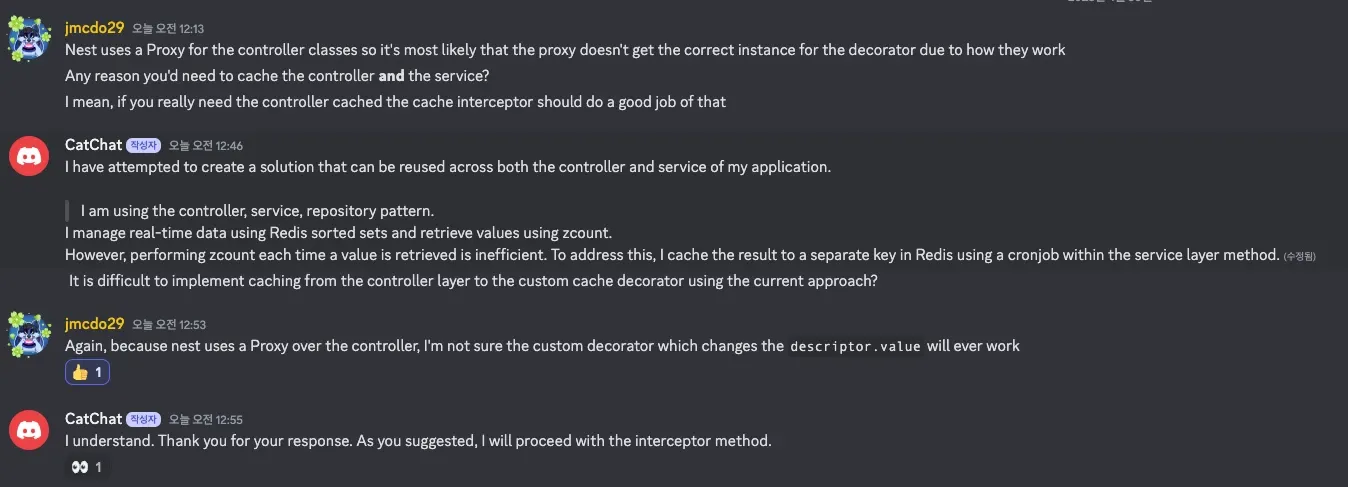
•
이에 Controller에서의 캐싱을 위한 별도의 Interceptor를 개발했다.
◦
NestJS 자체적으로 제공해주는 Cache Interceptor를 커스텀하였다.

@Injectable()
export class WavveCacheInterceptor implements NestInterceptor {
private allowedMethods = ["GET"];
private readonly cacheManagerIsv5OrGreater: boolean;
constructor(
@Inject(CACHE_MANAGER) private readonly cache: CacheWithStoreName,
private readonly httpAdapterHost: HttpAdapterHost,
private readonly reflector: Reflector,
) {
// We need to check if the cache-manager package is v5 or greater
// because the set method signature changed in v5
const cacheManagerPackage = loadPackage("cache-manager", "CacheModule", () =>
require("cache-manager"),
);
this.cacheManagerIsv5OrGreater = "memoryStore" in cacheManagerPackage;
Logger.warn(
'DEPRECATED! "CacheModule" (from the "@nestjs/common" package) is deprecated and will be removed in the next major release. Please, use the "@nestjs/cache-manager" package instead.',
);
}
async intercept(context: ExecutionContext, next: CallHandler<any>): Promise<Observable<any>> {
const options: WavveCacheOptions = this.reflector.get(CACHE_OPTIONS, context.getHandler());
if (!options) {
return next.handle();
}
const cacheStore: string = this.reflector.get(CACHE_STORE, context.getHandler());
if (!cacheStore || cacheStore !== this.cache.store?.name) {
return next.handle();
}
const { ttl = Infinity, key: customKey, validate = Boolean, logger = () => null } = options;
let cacheKey = `cache${this.trackBy(context)?.replaceAll("/", ":")}`;
if (customKey) {
cacheKey += `:${customKey}`;
}
try {
const value = await this.cache.get(cacheKey);
if (!isNil(value)) {
logger("Cache Hit", { cacheKey });
return of(value);
}
return next.handle().pipe(
tap(async (response) => {
if (response instanceof StreamableFile) {
return;
}
if (!validate(response)) {
throw new Error("cache error");
}
const cacheArgs = [cacheKey, response] as [string, any];
if (!isNil(ttl)) {
cacheArgs.push(this.cacheManagerIsv5OrGreater ? ttl : { ttl });
}
try {
await this.cache.set(...cacheArgs);
logger("Cached", { cacheKey });
} catch (err) {
Logger.error(
`An error has occurred when inserting "key: ${cacheKey}", "value: ${response}"`,
"CacheInterceptor",
);
}
}),
);
} catch {
return next.handle();
}
}
protected trackBy(context: ExecutionContext): string | undefined {
const httpAdapter = this.httpAdapterHost.httpAdapter;
const isHttpApp = httpAdapter && !!httpAdapter.getRequestMethod;
const cacheMetadata = this.reflector.get(CACHE_KEY_METADATA, context.getHandler());
if (!isHttpApp || cacheMetadata) {
return cacheMetadata;
}
const request = context.getArgByIndex(0);
if (!this.isRequestCacheable(context)) {
return undefined;
}
return httpAdapter.getRequestUrl(request);
}
protected isRequestCacheable(context: ExecutionContext): boolean {
const req = context.switchToHttp().getRequest();
return this.allowedMethods.includes(req.method);
}
}
TypeScript
복사
라이브러리화
•
해당 내용들을 바탕으로 NestJS에서 편하게 사용하기 위해 NPM 배포를 진행해봤다.


적잖은 관심을 받아서 기쁘다
Proxy와 Reflect
Proxy란
The Proxy object is used to define custom behavior for fundamental operations (e.g. property lookup, assignment, enumeration, function invocation, etc).
•
프록시 객체(Proxy object)는 대상 객체(Target object) 대신 사용된다. 대상 객체를 직접 사용하는 대신, 프록시 객체가 사용되며 각 작업을 대상 객체로 전달하고 결과를 다시 코드로 돌려준다.
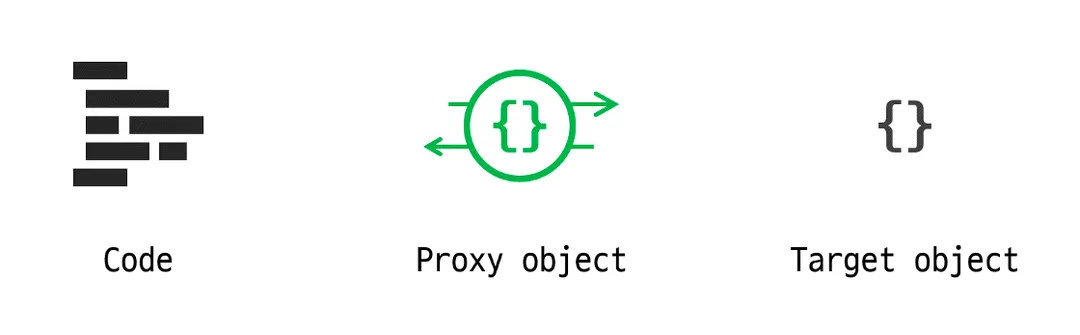
•
이러한 방식을 통해 프록시 객체는 JavaScript의 기본적인 명령에 대한 동작을 사용자 정의가 가능하도록 한다. 객체 자체가 처리하는 특정 명령을 재정의할 수 있게 되는 것이다.
•
이런 명령의 종류는 속성 검색, 접근, 할당, 열거, 함수 호출 등이 대표적이다.
Reflect란
Reflect is a built-in object that provides methods for interceptable JavaScript operations. The methods are the same as those of proxy handlers.
•
Reflect는 Proxy와 같이 JavaScript 명령을 가로챌 수 있는 메서드를 제공하는 내장 객체이다.
Reflect의 특징
•
Reflect는 함수 객체가 아닌 일반 객체이다.
•
[[Prototype]] 내부 슬롯을 가지며 그 값은 Object.prototype이다. (Reflect.__proto__ === Object.prototype)
•
[[Construct]] 내부 슬롯이 존재하지 않아 new 연산자를 통해 호출될 수 없다.
•
[[Call]] 내부 슬롯이 존재하지 않아 함수로 호출될 수 없다.
•
Proxy의 모든 트랩을 Reflect의 내장 메서드가 동일한 인터페이스로 지원한다.
예시 코드
•
Object를 하나 선언한다.
const obj = {
a: 'foo',
b: 'bar',
};
JavaScript
복사
•
Property a를 property accessor를 사용해 접근할 수 있다.
console.log(obj.a); // 'foo'
JavaScript
복사
•
Reflect.get() 메서드를 이용해 동일한 작업을 할 수 있다.
console.log(Reflect.get(obj, 'a')); // 'foo'
JavaScript
복사
•
Proxy constructor를 이용해 해당 object의 proxy를 만들 수 있다.
•
get handler를 통해 모든 property lookup들을 가로챌(intercepting) 수 있다.
const proxy = new Proxy(obj, {
get(target, property) {
return property in target ? target[property] : 'default';
},
});
JavaScript
복사
•
이제 property accessor 또는 Reflect.get()을 이용해 정의되지 않은 property에 접근하면 'default'라고 나온다.
console.log(proxy.c); // 'default'
console.log(Reflect.get(proxy, 'c')); // 'default'
JavaScript
복사
•
Proxy와 Reflect는 같이 사용할 수 있다.
•
예를 들어 Reflect를 사용해 no-op get handler로 Proxy를 만들 수 있다.
new Proxy(obj, {
get: Reflect.get,
});
JavaScript
복사
정리
•
◦
프록시 객체는 기본 operation에 대한 작업을 커스텀할 때 사용.
•
◦
가로챌 수 있는 자바스크립트 operation에 대한 메서드는 제공해주는 내장 객체.
◦
class C {
// declarative 하게
@Reflect.metadata(metadataKey, metadataValue)
method() {
}
}
// Imperative definition of metadata:
Reflect.defineMetadata(metadataKey, metadataValue, C.prototype, "method");
JavaScript
복사
•
◦
프로토타입 체이닝 속에서, 최초로 작업 요청을 받은 객체가 무엇인지 알 수 있게 해준다.
◦
Proxy 패턴으로 set 트랩 구현 시 프로토타입 체이닝으로 인해 의도하지 않은 객체에 property가 set되는 사이드 이펙트를 막을 수 있다.
▪
parent의 [[Set]]이 호출되면, Proxy의 set 트랩이 트리거 되고, target[key]는 결국 parent['job']이기 때문에 parent에 job 속성이 추가되고 값이 할당되게 된다.
function Obj(value) { this.value = value }
Obj.prototype.prototype_value = 20
var origin_object = new Obj(10)
var proxy_object = new Proxy(origin_object, {
get: function (target, key, receiver) {
// target === origin_object
// key : 호출한 key
// receiver === proxy_object
if(key === 'proxy_value') {
return 30
}
return Reflect.get(target, key, receiver);
},
set: function(target, key, value, receiver) {
if(key === 'proxy_value') {
console.log(target, key, value, receiver)
return true
}
return Reflect.set(target, key, value, receiver);
}
});
proxy_object.proxy_value = 40
console.log(
origin_object.value, // 10
origin_object.prototype_value, // 20
origin_object.proxy_value, // undefined
proxy_object.value, // 10
proxy_object.prototype_value, // 20
proxy_object.proxy_value, // 30
)
JavaScript
복사
1.
Obj 객체를 생성 한다.
2.
Proxy 로 생성한 Obj 를 Wrapping 한다.
3.
proxy_object 의 proxy_value 를 호출한다.
4.
이때 Proxy 객체를 생성할때, 선언한 handler 에 get 함수가 있었기 때문에, 해당 proxy_object 의 프로퍼티를 호출 할때, handler 의 get 함수를 먼저 호출한다.
5.
만약 Proxy handler 의 반환자로 Reflect 를 반환했다면, origin_object 객체를 탐색한다.
NestJS Controller

•
NestJS의 Controller 코드를 보면 Reflect라는 자바스크립트 내장 객체를 사용하고 있다.
export function Controller(
prefixOrOptions?: string | string[] | ControllerOptions,
): ClassDecorator {
const defaultPath = '/';
const [path, host, scopeOptions, versionOptions] = isUndefined(
prefixOrOptions,
)
? [defaultPath, undefined, undefined, undefined]
: isString(prefixOrOptions) || Array.isArray(prefixOrOptions)
? [prefixOrOptions, undefined, undefined, undefined]
: [
prefixOrOptions.path || defaultPath,
prefixOrOptions.host,
{ scope: prefixOrOptions.scope, durable: prefixOrOptions.durable },
Array.isArray(prefixOrOptions.version)
? Array.from(new Set(prefixOrOptions.version))
: prefixOrOptions.version,
];
return (target: object) => {
Reflect.defineMetadata(CONTROLLER_WATERMARK, true, target);
Reflect.defineMetadata(PATH_METADATA, path, target);
Reflect.defineMetadata(HOST_METADATA, host, target);
Reflect.defineMetadata(SCOPE_OPTIONS_METADATA, scopeOptions, target);
Reflect.defineMetadata(VERSION_METADATA, versionOptions, target);
};
}
TypeScript
복사
•
prefixOrOptions argument를 받아서 target object의 메타데이터로 정의한다.
•
메타데이터를 읽을 때는 Reflect.getMetadata 사용한다.
let metadataValue = Reflect.getMetadata(PATH_METADATA, target);
Plain Text
복사
•
반환 타입은 ClassDecorator이다.
◦
클래스를 호출하기 전 실행.
Controller - Scope
•
하나의 인스턴스만을 사용하는, 전역 상태를 가진 싱글톤 객체 사용.
•
싱글톤 스코프를 추천할 때
◦
어플리케이션 시작할 때 이니셜라이즈 한 번만 하고, 인스턴스 캐싱