기존 방식의 문제점

•
클라이언트측에서 /api/oauth/google을 호출 할 경우 AuthGuard로 인해 자동으로 구글 로그인 페이지로 redirect됩니다.
@Get()
@UseGuards(AuthGuard("google"))
@ApiOperation({
summary: "구글 로그인 페이지로 리다이렉트",
})
googleOAuth() {
// redirect google login page
return { msg: "Google Authentication" };
}
TypeScript
복사
•
그 후, 로그인을 완료할 경우 아래의 구글 측에서 /api/oauth/google/callback 으로 access token과 함께 callback합니다.
@Post("callback")
@ApiOperation({
summary: "구글 로그인 callback, 쿠키 생성 후 사용자에게 전송",
})
async googleOAuthCallback(@Body() body: AccessTokenDto, @Res() res: Response) {
const { accessToken } = body;
const userInfo = await this.googleOauthService.getUserInfo(accessToken);
const token = await this.googleOauthService.signIn({
oauthId: userInfo.data.sub,
name: userInfo.data.name,
});
if (token) {
res.cookie("access_token", token, {
sameSite: true,
secure: false, // 배포시에는 true로 바꿔야됨
httpOnly: true,
maxAge: 2 * 60 * 60 * 1000,
});
return HttpResponse.success({ validate: true });
}
return HttpResponse.success({ validate: false });
}
TypeScript
복사
•
이 경우, 클라이언트측에서는 /api/oauth/google/callback API를 호출한적이 없으므로 로그인 여부를 알 수 없고, 유저 정보 또한 얻을 수 없습니다.
•
SSR을 사용할 경우 문제 없이 유저 정보를 전송할 수 있지만, CSR을 사용하고 있는 상황에서는 해당 문제가 발생한다.
개선된 방식
•
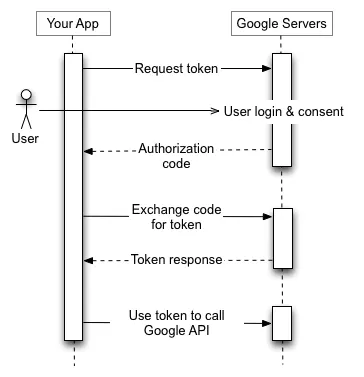
구글 공식 문서를 확인해본 결과 사용자가 request token을 주면 구글에서 authorization code를 보낸다.
•
그 후, 사용자는 authorization code를 이용해 access token을 요청하고, access token을 이용해 구글 로그인을 수행한다.
•
실제 프로젝트에 대입해보면 아래와 같은 흐름도가 나온다.
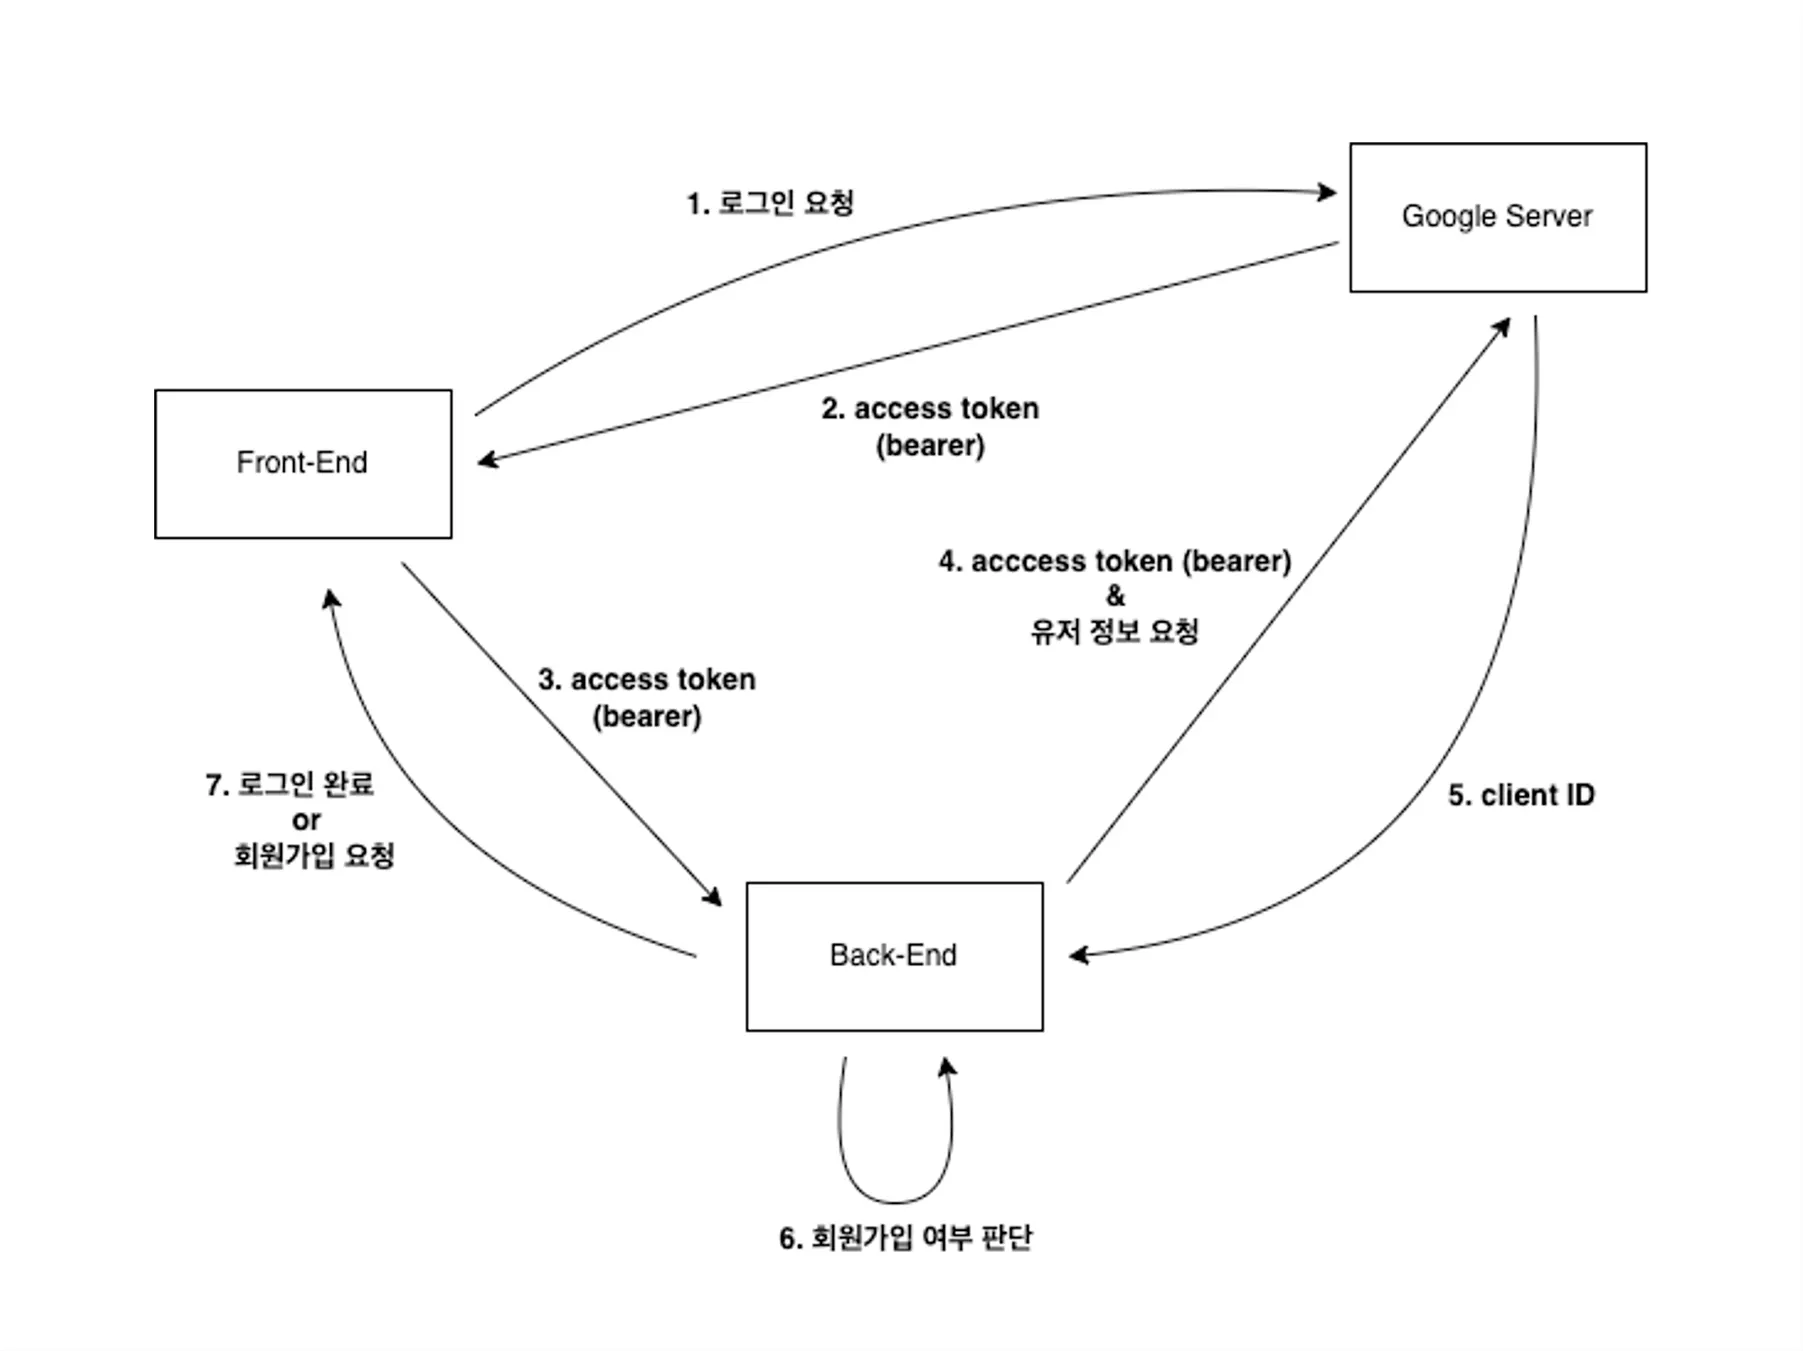
1.
Front-End에서 OAuth 로그인을 요청한다.
2.
Google Server에서 access token을 발행한다.
3.
Front-End는 발행 받은 access token을 /api/oauth/google/login API 호출시 POST를 통해 함께 보낸다.
4.
Back-End는 Front-End로 부터 받은 access token과 googleapis을 이용해 Google Server에 사용자 정보를 요청한다.
5.
유효한 access token일 경우 Google Server는 해당 사용자의 정보를 반환한다.
6.
사용자 정보를 payload에 담은 JWT를 쿠키로 클라이언트에게 전송한다.
a.
만약 회원가입이 필요할 경우 needRegister: True를 통해 Front-End에게 추가적인 회원가입 작업이 필요하다는 것들 알린다.
@Post("login")
@ApiOperation({
summary: "로그인, 쿠키 생성 후 사용자에게 전송",
})
async googleOAuthLogin(@Body() accessToken: AccessTokenDto, @Req() req: Request) {
const data = await this.googleOauthService.login(accessToken.access_token);
if (!data.needRegister) {
const token = this.jwtService.sign({ userId: data.userId });
req.res.cookie("access_token", token, {
sameSite: true,
secure: true, // 배포시에는 true로 바꿔야됨
httpOnly: true,
maxAge: 3650 * 24 * 60 * 60 * 1000, // (10 year)
});
}
return HttpResponse.success(data);
}
TypeScript
복사
async login(token: string) {
const tokenInfo = await this.oauthClient.getTokenInfo(token);
const oauthId = tokenInfo.sub.toString();
const userId = await this.findUserIdByOAuthId(oauthId).then((user) => {
return user?.id;
});
if (!userId) {
return { userId: null, needRegister: true };
}
return { userId, needRegister: false };
}
TypeScript
복사
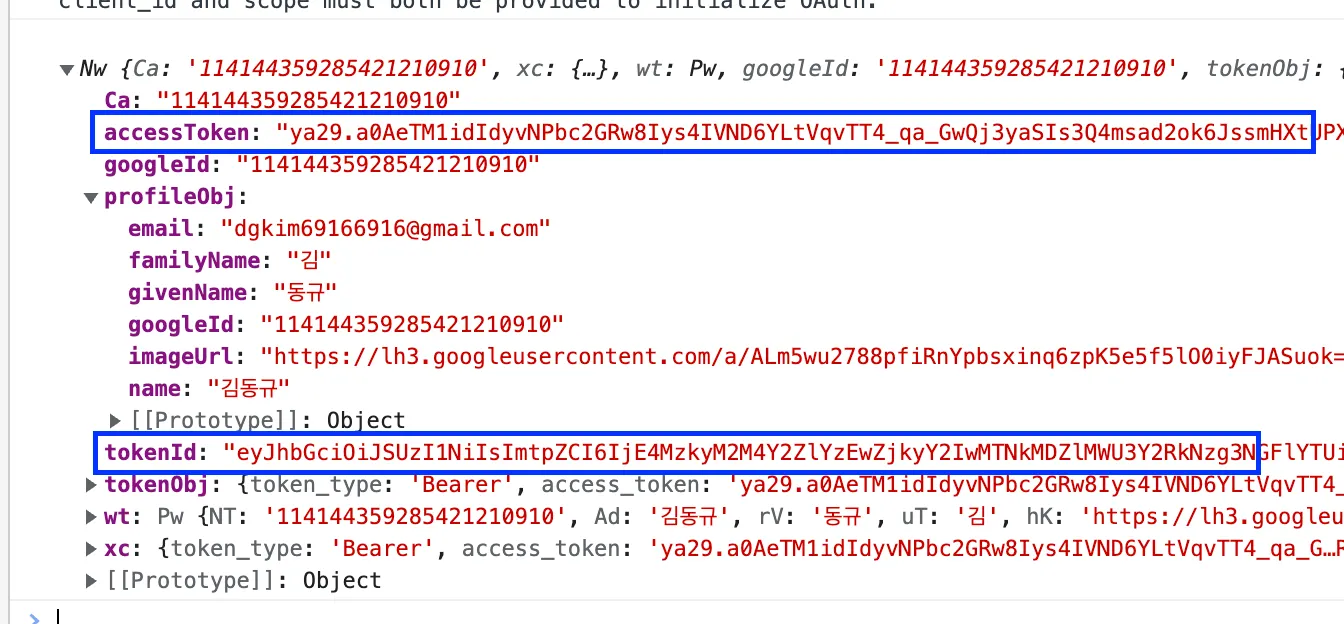
accessToken, tokenId
•
Front-End에서 Google OAuth를 요청할 경우 아래와 같은 데이터를 받는다.
•
여기서 @react-oauth/google 라이브러리를 이용해 credential을 받을 경우 accessToken이 아니라 tokenId를 반환한다.
•
개발할 당시 access_token이라는 존재를 모르고, 계속 엉뚱한 토큰(tokenId)으로 유저 정보를 요청했다.
◦
tokenId는 JWT이고, access_token는 bearer 토큰이다.
•
하지만 tokenId로는 구글 서버로 유저 정보 요청을 할 수 없고, 500 에러가 발생한다.
import { GoogleLogin, CredentialResponse } from "@react-oauth/google";
const GoogleOAuthButton = () => {
const handleSuccessLogin = ({ credential }: CredentialResponse) => {};
return <GoogleLogin onSuccess={handleSuccessLogin} useOneTap />;
};
TypeScript
복사
해결
https://accounts.google.com/o/oauth2/auth?client_id={클라이언트 ID}&redirect_uri={리디렉션 URI}&response_type=token&scope=https://www.googleapis.com/auth/userinfo.profile
Plain Text
복사
•
위와 같은 URL로 Google OAuth를 요청할 경우 flagment로 access_token이 온다.
•
이걸 Front-End에서 처리해서 Back-End로 보내주는 형식으로 해결했다.
.png&blockId=b1be8293-d96c-404f-9d7d-6b9d27bb7dce)
flagment에 access_token이 실린 모습