
Cluster Mode
PM2의 cluster mode
The cluster mode allows networked Node.js applications (http(s)/tcp/udp server) to be scaled accross all CPUs available, without any code modifications. This greatly increases the performance and reliability of your applications, depending on the number of CPUs available.
Under the hood, this uses the Node.js cluster module such that the scaled application’s child processes can automatically share server ports.
•
코드 수정 없이 Node.js 애플리케이션을 CPU에 따라 확장할 수 있다.
•
안정성과 성능을 크게 향상할 수 있습니다.
•
Node.js의 cluster mode를 사용한다.
Node.js의 cluster mode
A single instance of Node.js runs in a single thread. To take advantage of multi-core systems, the user will sometimes want to launch a cluster of Node.js processes to handle the load.
The cluster module allows easy creation of child processes that all share server ports.
•
Node.js의 단일 인스턴스는 단일 스레드에서 실행되는데, 멀티 코어 시스템을 이용하기 위해서 Node.js 프로세스들을 클러스터로 사용할 수 있다.
•
이를 통해 모든 서버 포트를 공유하는 하위 프로세스를 생성한다.
The worker processes are spawned using the child_process.fork() method, so that they can communicate with the parent via IPC and pass server handles back and forth.
•
이 하위 프로세스들은 child_process.fork() 메서드를 사용해서 생성되는데, 부모 자식 간의 통신을 위한 IPC(Inter-process communication) 채널을 가지고 있으며, 생성된 각 프로세스는 자체 V8 인스턴스가 있다.
정리
1.
PM2의 Cluster mode는 Node.js의 Cluster module를 통해 작동한다.
2.
Node.js Cluster module은 Node.js에서 멀티코어 시스템을 이용할 수 있도록 포트를 공유하는 Child process를 생성한다.
3.
부모 프로세스가 요청을 받은 후, 자식 프로세스들에게 재분배한다.
4.
각 Child process는 각각의 V8에서 작동하므로, Node 인스턴스를 더 띄운 것과 같이 동작한다.
5.
인메모리에 의존하지 않는 프로그램을 만들면 위와 같은 확장에 더 용이하다.
Process 간의 불평등한 분배
운영체제의 문제
•
서버에 요청을 보내보면 하나의 Worker만 일하는 것을 알 수 있다.
◦
마지막으로 fork()된 프로세스가 일을 주로 처리한다.
•
하지만 artillery 라이브러리를 이용해 많은 트래픽을 주었을 경우, 적어도 2개 이상의 프로세스가 일하는 것을 볼 수 있다.
Loads have been observed where over 70% of all connections ended up in just two processes, out of a total of eight.
Node.js 공식 문서
•
원래대로하면 8개의 프로세스가 균등하게 일해야하지만, 2개의 프로세스가 70% 이상의 일을 처리한다.
The second approach is where the primary process creates the listen socket and sends it to interested workers. The workers then accept incoming connections directly.
The second approach should, in theory, give the best performance. In practice however, distribution tends to be very unbalanced due to operating system scheduler vagaries. Loads have been observed where over 70% of all connections ended up in just two processes, out of a total of eight.
Node.js 공식 문서
•
공식 문서에 따르면 이는 Round-Robin 방식은 맞지만, 운영체제의 Scheduler의 영향을 받기 때문이라고 한다. 운영체제가 하나의 프로세스로도 충분하다고 판단할 경우 일을 분배하지 않기 때문에 생기는 문제이다.
불평등 분배로 인한 메모리 누수
•
PM2에서는 active handles를 확인할 수 있는데, 이것들은 커넥션의 수라고 볼 수 있다.
•
일반적으로 처리 속도가 빨라서 커넥션의 수가 늘어나더라고 큰 장애는 생기지 않지만, 메모리 측면으로는 좋지 않다. 처리가 완료되면 그 만큼 커넥션을 닫아서 메모리를 회수해야 하지만, 하나의 프로세스에 대기열이 많아질수록 점유하고 있는 메모리 크기도 늘어나게 되고, 이는 메모리 누수의 가능성을 높인다.
•
이 문제를 해결하기 위해 자식 프로세스끼리 통신을 구축하고, 실제로 트래픽을 분배하는 건 오히려 비용을 늘리는 꼴이 된다.
•
궁극적으로 이 문제를 해결하기 위해 별도의 Proxy를 두는 게 저렴할 것이다. 하나의 Proxy 서버를 두고, 그 서버가 요청을 받아서 여러 기준(알고리즘)을 통해 직접 분배한다.
→ 즉, 이렇게 부하를 나누는 걸 로드 밸런싱이라 한다.
Process 간의 평등한 분배 (Nginx, PM2)
•
메모리 측면에서 더 개선할 수 있도록 Nginx를 사용한다.
◦
Nginx를 사용하는 이유는 정적 자원에 대한 캐시를 포함해 여러가지 있지만, 여기서는 로드 밸런싱을 중점으로 보겠다.
NestJS
// main.ts
...
import { SetResponseHeader } from "./middleware/zero-downtime-deploy/set-response-header.middleware";
import { GlobalService } from "./middleware/zero-downtime-deploy/is-disable-keep-alive.global";
async function bootstrap() {
...
GlobalService.isDisableKeepAlive = false;
app.use(SetResponseHeader);
// Starts listening to shutdown hooks
app.enableShutdownHooks();
await app.listen(PORT as string, () => {
process.send("ready");
console.log(`application is listening on port ${PORT}`);
});
}
bootstrap();
TypeScript
복사
// set-response-header.middleware.ts
import { NextFunction, Request, Response } from "express";
import { GlobalService } from "./is-disable-keep-alive.global";
export function SetResponseHeader(req: Request, res: Response, next: NextFunction) {
if (GlobalService.isDisableKeepAlive) {
res.set("Connection", "close");
}
next();
}
TypeScript
복사
// graceful-shutdown.ts
import { Injectable, OnApplicationShutdown } from "@nestjs/common";
import { GlobalService } from "./is-disable-keep-alive.global";
@Injectable()
export class GracefulShutdown implements OnApplicationShutdown {
onApplicationShutdown(signal: string) {
if (signal === "SIGINT") {
GlobalService.isDisableKeepAlive = true;
console.log("server closed");
}
}
}
TypeScript
복사
PM2
Front-End
pm2 serve dist —spa —name client
Back-End
// ecosystem.config.js
module.exports = {
apps: [{
name: "server",
script: "dist/main.js",
cwd: "/root/Web04-Fitory/server",
instances: 0,
exec_mode: "cluster",
wait_ready: true,
listen_timeout: 50000,
kill_timeout: 5000
}]
}
JavaScript
복사
•
실행되는 프로세스들은 server라는 이름이며, 스크립트는 main.js를 사용한다.
•
instances에 0을 넣으면 최대 코어 수 만큼 instance를 만든다. (max와 동일)
•
실행 모드(exec_mode)는 cluster로 설정했다.
•
.env 설정 또한 PM2로 관리가 가능하다.
•
하지만 이 경우에 env 관리 어렵다고 생각되어 env는 굳이 PM2로 관리 하지 않는다.
module.exports = {
apps: [{
name: "server",
script: "dist/main.js",
cwd: "/root/Web04-Fitory/server",
env: {
PORT: "8080",
}
}]
};
JavaScript
복사
실행 결과

Nginx
# www.fitory.ga 또는 fitory.ga로 들어올 경우 강제로 https로 redirect 해준다.
server {
listen 80 default_server;
listen [::]:80 default_server;
server_name fitory.ga www.fitory.ga;
if ($host = www.fitory.ga) {
return 301 https://$host$request_uri;
} # managed by Certbot
if ($host = fitory.ga) {
return 301 https://$host$request_uri;
} # managed by Certbot
return 404;
}
# https 설정 부분이다. letsencrypt와 certbot을 이용했다.
server {
listen [::]:443 ssl ipv6only=on; # managed by Certbot
listen 443 ssl; # managed by Certbot
ssl_certificate /etc/letsencrypt/live/fitory.ga/fullchain.pem; # managed by Certbot
ssl_certificate_key /etc/letsencrypt/live/fitory.ga/privkey.pem; # managed by Certbot
include /etc/letsencrypt/options-ssl-nginx.conf; # managed by Certbot
ssl_dhparam /etc/letsencrypt/ssl-dhparams.pem; # managed by Certbot
root /var/www/html;
charset utf-8;
underscores_in_headers on;
add_header Strict-Transport-Security "max-age=31536000" always;
location / {
proxy_pass http://localhost:3000/;
proxy_http_version 1.1;
proxy_cache_bypass $http_upgrade;
proxy_set_header Upgrade $http_upgrade;
proxy_set_header Connection "upgrade";
proxy_set_header Host $host;
proxy_set_header X-Real-IP $remote_addr;
proxy_set_header X-Forwarded-For $proxy_add_x_forwarded_for;
proxy_set_header X-Forwarded-Proto $scheme;
proxy_set_header X-Forwarded-Host $host;
proxy_set_header X-Forwarded-Port $server_port;
}
location /api {
proxy_pass http://localhost:8080/api;
proxy_http_version 1.1;
proxy_cache_bypass $http_upgrade;
proxy_set_header Upgrade $http_upgrade;
proxy_set_header Connection "upgrade";
proxy_set_header Host $host;
proxy_set_header X-Real-IP $remote_addr;
proxy_set_header X-Forwarded-For $proxy_add_x_forwarded_for;
proxy_set_header X-Forwarded-Proto $scheme;
proxy_set_header X-Forwarded-Host $host;
proxy_set_header X-Forwarded-Port $server_port;
}
gzip on;
gzip_comp_level 2;
gzip_proxied any;
gzip_min_length 1000;
gzip_disable "MSIE [1-6]\."
gzip_types text/plain text/css application/json application/x-javascript text/xml application/xml application/xml+rss text/javascript;
}
Bash
복사
•
이제 배포한 퍼블릭 도메인을 입력하면 포트 80번 없이도 3000번 포트로 자동으로 이동하게 되며, /api 로 올 경우에는 PM2로 클러스트링된 서버들로 이동하게 된다.
•
또한 기존처럼 하나의 프로세스가 모든 일을 처리하는 것이 아닌, 각 서버들이 번갈아가며 로직을 수행한다.
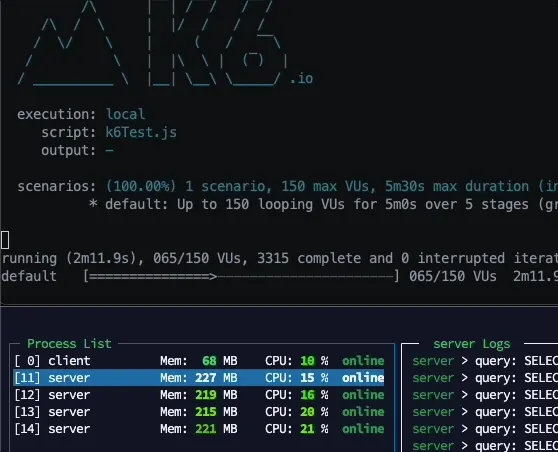
실행 결과
•
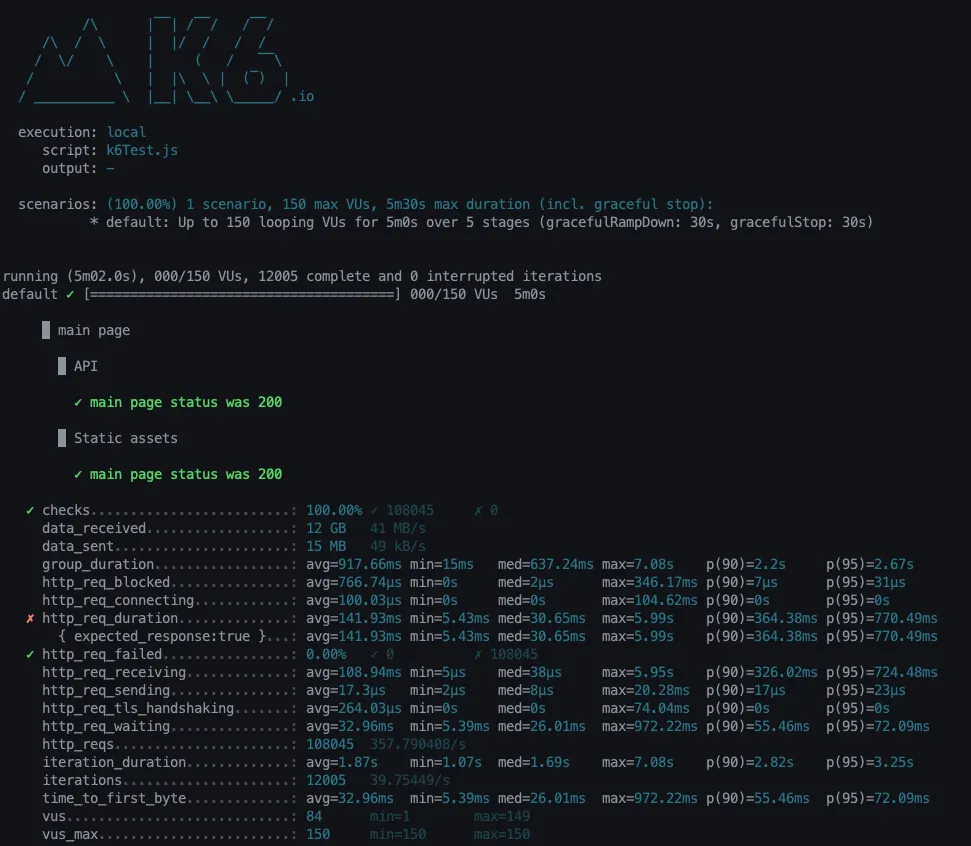
k6로 테스트 진행시 4개의 cluster로 골고루 분산되고 있는걸 확인할 수 있다.
•
k6 결과
◦
p(90) : 364ms, p(95) : 770ms
◦
API 비동기 호출로 해결 가능성 보임
•
개발자 도구 네트워크를 확인해본 결과 API 호출을 동기적으로 부르는 문제가 있다.

PM2와 무중단 배포
•
LINE 테크 블로그, 굉장히 잘 설명 되어있다.


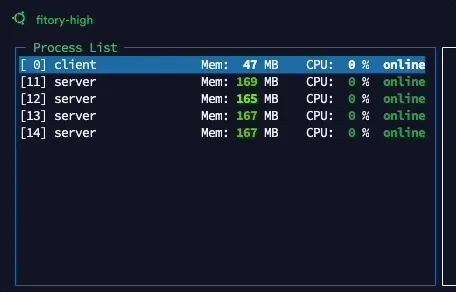
실행 결과
•
pm2 reload all 을 한 결과 2개식 차례대로 배포가 되고 있는 모습을 볼 수 있다.
무중단 배포
왜 필요할까?

•
서비스가 업데이트 되고, 이를 서버에 배포할 경우 배포하는 시간 동안 서비스는 중지될 수 밖에 없다.
•
사용자가 여러 시간 대에 자주 접하는 서비스라면, 배포하는 동안 사용자들은 서비스를 이용하지 못하는 상황이 발생한다.
•
어플은 앱스토어에서 배포를 진행하며 앱을 다운하는 동안 어플을 사용하지 못하는건 어떻게 보면 당연하기 때문에 문제가 되지 않는다.
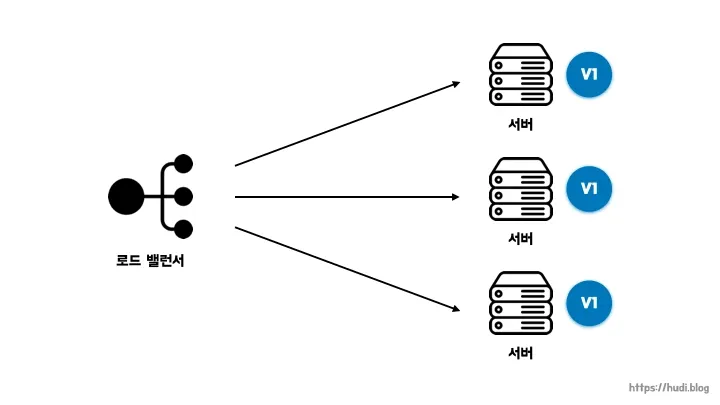
•
무중단 배포 아키텍쳐
롤링 배포 (Rolling Deployment)
방식 1 - 인스턴스 추가, 삭제

•
인스턴스를 하나 추가하고, 새로운 버전을 실행한다. 로드 밸런서에 해당 인스턴스를 연결하고, 기존 구버전이 실행되는 인스턴스 하나를 줄인다.
•
서버 개수를 유연하게 조절할 수 있는 AWS와 같은 클라우드 기반으로 서비스를 운영할 때 적합한 방식같다.
•
하지만 인스턴스를 추가하고, 삭제하는 과정에서 비용이 발생할거 같다. docker를 이용해 해결 가능.
방식 2 - 로드 밸런싱
•
구버전이 실행되고 있는 서버 하나로 트래픽이 가지 않게 로드 밸런서에서 제외한다.
•
로드 밸런서에서 제외되서 트래픽이 가지 않는 상태에서 해당 서버를 업데이트한다.
•
이 과정을 반복해서 모든 서버를 업데이트 한다.
•
클라우드 환경분만 아니라, 물리적인 서버로 서비스를 운영하는 상황에서도 사용할 수 있다.
장점
•
k8s, elastic beanstalk과 같은 많은 orchestration 도구에서 지원하여 간편하다.
•
많은 서버 자원을 확보하지 않아도 무중단 배포가 가능하다.
•
인스턴스마다 차례로 배포를 진행하기 때문에 상황에 따라 손쉽게 롤백이 가능하다.
단점
•
방식 2와 같은 경우 배포 도중 서비스중인 인스턴스의 수가 줄어들게 되어 각각의 서버가 부담하는 트래픽의 양이 늘어날 수 있다.
•
구버전과 신버전이 동시에 서비스되기 때문에 호환성 문제가 발생할 수 있다.
Blue-Green 배포
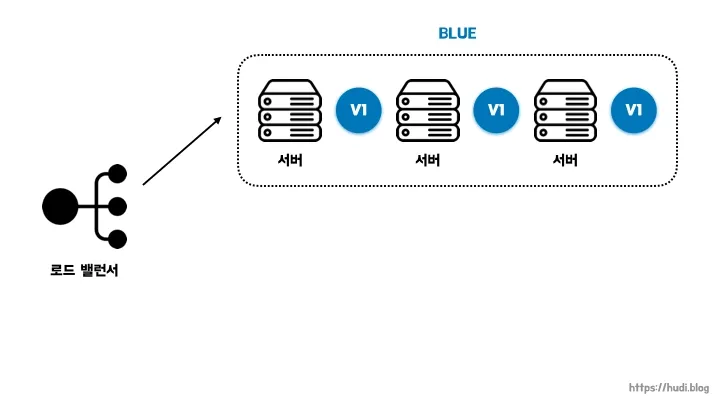
•
Blue = 현재 운영중인 버전(구버전), Green = 새로 배포할 버전(신버전)
•
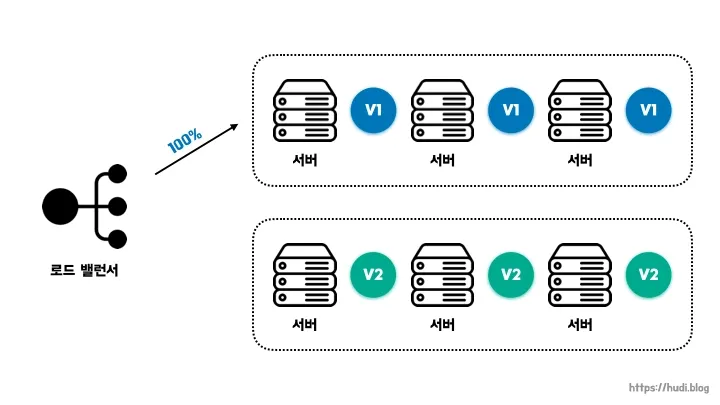
트래픽을 한번에 구버전에서 신버전으로 옮기는 방법이다.
•
Blue와 Green 서버를 동시에 구성해둔 상태로 배포 시점에 로드 밸런서가 트래픽을 Blue에서 Green으로 일제히 전환시킨다.
•
Green 버전 배포가 성공적으로 완료되면, Blue를 제거하거나, 유지해둘 수 있다.
장점
•
배포 속도가 빠르며, 장애가 발생했을 때 로드 밸런서가 기존 서버를 가르키면 되기 때문에 롤백이 쉽다.
•
트래픽을 한번에 새로운 버전으로 옮기기 때문에 호환성 문제가 발생하지 않는다.
단점
•
실제 운영에 필요한 서버 리소스의 2배를 확보해야한다. 추가 비용이 발생한다.
카나리(Canary) 배포
•
점진적으로 구버전에 대한 트래픽을 신버전으로 옮기는 방식이다. (롤링 배포와 비슷)
•
다만, 카나리 배포의 핵심은 새로운 버전에 대한 오류를 조기에 감지하는 것이다.
•
소수 인원에 대해서만 트래픽을 새로운 버전에 옮겨둔 상태로 서비스를 운영하고, 문제가 없다고 판단될 때 모든 트래픽을 신규 버전으로 옮긴다.
장점
•
새로운 버전으로 인한 위험을 최소화할 수 있다.
단점
•
롤링 배포와 마찬가지로 신/구 버전이 동시에 존재하므로 호환성 문제가 발생할 수 있다.